1. Basic Renderer (continued)
1.16 Command-line tools
The renderer is a large enough project that the best way to work with it is using command-line tools. You might think that an IDE is all that you need to work with any project. But IDEs cannot handle very large projects. The renderer project is on the borderline of what an IDE (like VS Code) can comfortably handle. So the renderer is a good project for learning command-line techniques for handling code.
MIT has a course that is an interesting alternative to much of this information.
The following book chapter contains another explanation of working with Java code.
Another web site (also at MIT) has good advice about structuring large projects.
1.16.1 Command-line shells
A command-line is "read-eval-print loop" (REPL) for a programming language.
The programming language used at an operating system's command-line is often
called a "shell language". On a Linux computer, there are several shell
languages. The most common is bash, but there is also, for example, csh,
ksh,zsh, andfish. On a Windows computer there are two shell languages,cmdandPowerShell` (and also, if you use WSL, all the Linux shell languages).
All these shell languages have all the elements of a regular programming language, variables, conditional expressions, for-loops, functions, and data structures. Windows PowerShell is even an object-oriented language. These are programming languages whose main use is writing programs (usually called "scripts" or "batch files") that control actions performed by the operating system. These shell languages emphasize things like creating folders and files, moving around in the file system, running programs, and doing administrative tasks (creating accounts, installing or configuring software, monitoring performance, backing up files, etc.).
When we type a command at a command-line prompt, we are writing one line of code in one of the these shell programming languages (bash, cmd, or PowerShell). Typing one command-line at the cmd or bash prompt is pretty much the same thing as typing one line of code at a JShell prompt or a Python prompt. Just as each of Java and Python have a syntax, the shell languages bash, cmd, and PowerShell each have a syntax. In this section we will look at some aspects of the cmd syntax. The cmd and bash shell languages have similar syntax. Most of what we describe in this section is true for both cmd and bash. (PowereShell is very different from the other two.)
A shell command-line can be made up of several components:
- program names,
- command-line arguments,
- file names,
- I/O redirection operators (
<,>,>>, and2>), - the pipe operator (the
|character).
Here is a simplified grammar for how the cmd shell language uses the above components.
    command_line ::= conditional [ '&' conditional ]*

    conditional ::= pipeline [ ('&&' | '||') pipeline ]*

    pipeline ::= command [ '|' command ]*

    command ::= programName [ arg ]* [redirect]*
              | '(' command_line ')' [redirect]*

    redirect ::= redirectOp fileName
               | '2>&1'
               | '1>&2'

    redirecOp ::= '<' | '>' | '>>' | '2>' | '2>>'
In the sections that follow, most of the command-lines will use one of Java's
built-in command-line tools, the Java compiler, the Java virtual machine, the
JavaDoc documentation tool, the jar archiving tool, and the Java REPL.
Here are some references for the CMD shell syntax.
- Windows CMD Shell - How-to guides and examples
- How-to: Redirection
- How-to: Conditional Execution
- Escape Characters, Delimiters and Quotes at the Windows command line
- An A-Z Index of Windows CMD commands
- Windows Commands
- Command-line syntax key
- cmd
- Command shell overview
- Using command redirection operators
- The Windows Command Shell
Here are some references for the bash shell syntax.
1.16.2 Console, terminal, tty
When you begin to read and learn about the command-line, along with the word "shell" you will often see the words "console", "terminal" and "tty". These three words are often used interchangeably, but in some situations they have distinct meanings. In a modern operating system, like Windows or Linux, they refer to the program that the shell interpreter (bash, cmd, or PowerShell), or any other "command-line program", runs in. In a sense, a terminal is the GUI for command-line programs.
Here are some example definitions for these words.
Microsoft has good documentation about its modern, open source Windows Terminal program and the Console interface.
- Windows Command-Line: Backgrounder
- Windows Terminal, Console and Command-Line repo
- Windows Command Line
- Windows Console documentation
- Keyboard Input Overview
Linux tends to use the term "tty" for a terminal.
- tty(1) - print the file name of the terminal connected to standard input
- tty(4) - controlling terminal
- termios(3) - get and set terminal attributes
Here are a few historical explanations of these terms.
- What's the difference between a console, a terminal, and a shell?
- The terminal, the console and the shell - what are they?
- Understanding ASCII (and terminals)
- The TTY demystified
Terminals, consoles, command-lines, and shells are at the lowest level of a hierarchy of increasingly sophisticated user interfaces to computers.
- CLI - Command-line interface
- TUI - Text-based user interface
- GUI - Graphical user interface
- UI - User interface
TUI interfaces are interesting. You can describe them as "text based" but not
"line based". Another way to describe them is a GUI where the fundamental pixel
is a character instead a dot. So a TUI "framebuffer" (the screen) has the
structure of a two-dimensional array of char,
instead of the GUI framebuffer which is a two-dimensional array of Color.
1.17 Packages, imports, classpath
Large Java programs are always divided up into classes and the classes are organized into packages. This makes large programs easier to understand and work with.
We need to review some of the details of how the Java programming language uses packages. But first, let us review how Java classes are defined and how the Java compiler compiles them.
1.17.1 Compiling
A Java class is defined in a text file with the same name as the class and with the filename extension ".java". When the compiler compiles the class definition, it produces a binary (machine readable) version of the class and puts the binary code in a file with the same name as the class but with the file name extension ".class".
Every Java class will make references to other Java classes. For example,
here is a simple Java class called SimpleClass that should be stored in
a text file called "SimpleClass.java".
This class refers to the Scanner class, the String class, the System
class, the InputStream class (why?), the PrintStream class (why?), and, in
fact, many other classes. When you compile the source file "SimpleClass.java",
the compiler produces the binary file "SimpleClass.class". As the compiler
compiles "SimpleClass.java", the compiler checks for the existence of all
the classes referred to by "SimpleClass.java". For example, while compiling
"SimpleClass.java" the compiler looks for the file "Scanner.class". If the
compiler finds it, the compiler continues with compiling "SimpleClass.java"
(after the compiler makes sure that your use of Scanner is consistent with
the definition of the Scanner class). But if "Scanner.class" is not found,
then the compiler looks for the text file "Scanner.java". If the compiler finds
"Scanner.java", the compiler compiles it to produce "Scanner.class", and then
continues with compiling "SimpleClass.java". If the compiler cannot find
"Scanner.java", then you get a "class not found" compiler error from compiling
"SimpleClass.java". The same goes for all the other classes referred to by
"SimpleClass.java".
Here is an important question. When the compiler sees, in the compiling of
"SimpleClass.java", a reference to the Scanner class, how does the compiler
know where it should look for the files "Scanner.class" or "Scanner.java"?
These files could be anywhere in your computer's file system. Should the
compiler search your computer's entire storage drive for the Scanner
class? The answer is no, for two reasons (one kind of obvious and one kind
of subtle). The obvious reason is that the computer's storage drive is very
large and searching it is time consuming. If the compiler has to search your
entire drive for every class reference, it will take way too long to compile
a Java program. The subtle reason is that it is common for computer systems
to have multiple versions of Java stored in the file system. If the compiler
searched the whole storage drive for classes, it might find classes from
different versions of Java and then try to use them together, which does
not work. All the class files must come from the same version of Java.
The compiler needs help in finding Java classes so that the compiler only looks in certain controlled places in the computer's file system and so that it does not choose classes from different versions of Java.
The import statements at the beginning of a Java source file are part of the solution to helping the compiler find class definitions.
An import statement tells the Java compiler how to find a class definition. In "SimpleClass.java", the import statement
tells the compiler to find a folder named "java" and then within that folder find a folder named "util" and then within that folder find a class file named "Scanner.class" (or a source file named "Scanner.java").
The folders in an import statement are called packages. In Java, a package is a folder in your computer's file system that contains a collection of Java class files or Java source files. The purpose of a package is to organize Java classes. In a large software project there will always be many classes. Having all the classes from a project (maybe thousands of them) in one folder would make understanding the project's structure and organization difficult. Combining related classes into a folder helps make the project's structure clearer.
The import statement
tells us (and the compiler) that Java has a package named java.util. The
Scanner class is in the package java.util (notice that the package name
is java.util, not util). Look at the Javadoc for the Scanner class.
The very beginning of the documentation page tells us the package that this class is in.
What about the class String? Where does the compiler look for the String
class? Notice that there is no import statement for the String class. Look
at the Javadoc for the String class.
The String class is in a package named java.lang. The java.lang package
is automatically imported for us by the Java compiler. This package contains
classes that are so basic to the Java language the all Java programs will
need them, so these classes are all placed in one package and that package
gets automatically imported by the Java compiler.
We still haven't fully explained how the Java compiler finds the Scanner
class. The import statement
tells the compiler to find a folder called "java" and the Scanner class
will be inside the "util" subfolder of that folder. But where does the
compiler find the "java" folder? Should it search your computer's entire
file system for a folder called "java"? Obviously not, but we seem to be
right back to the problem that we started with: Where does the compiler
look in your computer's file system? The answer is another piece of the
Java system, something called the "classpath".
1.17.2 Classpath
The classpath is a list of folder names that the compiler starts its search from when it searches for a package. A classpath is written as a string of folder names separated by semicolons (or colons on a Linux computer). A Windows classpath might look like this.
This classpath has three folder names in its list. A Linux classpath might look like this.
When you compile a Java source file, you can specify a classpath on the compiler command-line.
The Java compiler will only look for packages that are subfolders of the folders listed in the classpath.
The Java compiler has some default folders that it always uses as part of
the classpath, even if you do not specify a value for the classpath. The
JDK that you install on your computer is always part of the compiler's
classpath. So Java packages like java.lang and java.util (and many
other packages), which are part of the JDK, are always in the compiler's
classpath.
If you do not specify a classpath, then the compiler's default classpath will include the directory containing the file being compiled (the current directory). However, if you do specify a classpath, then the compiler will not automatically look in the current directory. Usually, when someone gives the compiler a classpath, they explicitly include the "current directory" in the classpath list. In a classpath, the name you use for the "current directory" is a single period, ".". So a classpath that explicitly includes the current directory might look like this.
You can put the "." anywhere in the classpath, but most people put it at the beginning of the classpath to make it easier to read. A common mistake is to specify a classpath but forget to include the current directory in it.
1.17.3 Package statement
Here is an example of an import statement from our renderer.
This import statement says that there is a folder named "renderer" with a subfolder named "scene" with a subfolder named "util" that contains a file named "DrawSceneGraph.class" (or "DrawSceneGraph.java"). The file "DrawSceneGraph.java" begins with a line of code called a package statement.
A package statement must come before any import statements.
A class file contains a "package statement" declaring where that class should be located. Any Java program that wants to use that class (a "client" of the class) should include an "import statement" that matches the "package statement" from the class. When the client is compiled, we need to give the compiler a "classpath" that tells the compiler where to find the first folder named in the import statement (in this example, the folder named "renderer").
A Java class is not required to have a package statement. A class without a package statement becomes part of a special package called the unnamed package. The unnamed package is always automatically imported by the compiler. The unnamed package is used mostly for simple test programs or simple programs demonstrating an idea, or examples programs in introductory programming courses. The unnamed package is never used for library classes or classes that need to be shared as part of a large project.
1.17.4 Import statements
A Java class file is not required to have any import statements. You can
use any class you want without having to import it. But if you use a class
without importing it, then you must always use the fully qualified name
for the class (also called the "full package name" for the class). Here is
an example. If we import the Scanner class,
The we can use the Scanner class like this.
But if we do not import the Scanner class, then we can still use it, but
we must always refer to it by its full package name, like this.
Every Java class has two names, its simple name and its fully qualified
name. Scanner is a simple name and java.util.Scanner is a fully qualified
name. If you use an appropriate import statement, then you can use the simple
name for a class instead of its fully qualified name. Whether you use an import
statement or not, you can always use the fully qualified name for a class.
If you are using a class in many places in your code, then you should import it and use its simple name. But if you are referring to a class in just a single place in your code, then you might choose to not import it and instead use the fully qualified name for the class.
We can import Java classes using the wildcard notation. The following
import statement imports all the classes in the java.util package,
including the Scanner class.
There are advantages and disadvantages to using wildcard imports. One advantage
is brevity. If you are using five classes from the java.util package, then
you need only one wildcard import instead of five fully qualified imports.
One disadvantage is that wildcard imports can lead to name conflicts. The
following program will not compile because both the java.util and the
java.awt packages contain a class called List. And both the java.util
and the java.sql packages contain a class called Date.
We can solve this problem by combining a wildcard import with a fully qualified import.
You can try compiling these last two examples with the Java Visualizer.
1.17.5 Fully qualified names for classes
We mentioned the "fully qualified name" for a class. Let's be more precise about what the "fully qualified name" (also called the "full package name") of a class is and how it compares to the "fully qualified file name" (or "full path file name") of a class file.
The file system on your computer is a tree data structure. The internal nodes
of the tree are folders and the leaf nodes are files. The root of the file
system tree is the folder called / in Linux, and it is a "drive letter",
like C:\, in Windows. All files on your computer are somewhere in the file
system tree. Given any file in the file system, there is a path from the root
of the file system tree to the file. The full path name (or "fully
qualified name") of the file is derived from that path. For example,
consider the following file system tree.
    C:\
    |   banana.txt
    |   pineapple.txt
    |
    +---one
    |   |   apple.txt
    |   |   Pear.java
    |   |
    |   \---two
    |       |   Grape.java
    |       |   Plum.java
    |
    \---two
        |   Plum.class
        |
        \---three
            |   apple.txt
            |   Pear.class
            |
            \---two
                |   Grape.class
                |   Plum.class
There are two files with the name "apple.txt". They have different full path names, "C:\one\apple.txt" and "C:\two\three\apple.txt". There are two files with the name "Plum.class". They have full path names "C:\two\Plum.class" and "C:\two\three\two\Plum.class". There are three folders named "two". They have full path names "C:\one\two", "C:\two", and "C:\two\three\two".
Every file has multiple relative path names which are substrings of the
full path name that start just after any \ character. For example, the file
"C:\two\three\apple.txt" has the relative path names "two\three\apple.txt",
"three\apple.txt", and "apple.txt". A "full path name" uniquely identifies
a file in the file system tree. A "relative path name" is not unique. For
example, the relative path name "two\Plum.class" can identify two files. A
relative path name can only be used "relative" to some directory. If we are
currently in the directory "C:\two\", then the relative path name
"three\apple.txt" identifies a file, but if we are currently in the root
directory "C:\", then the relative path name "three\apple.txt" is not valid.
The relative path name "two\Plume.class" is valid from two different current
directories.
Now consider the file "C:\two\three\two\Plum.class". That name is the full path name to a class file, but it is not what Java calls a "full package name" for a class.
There may be a package statement inside the source code file "Plum.java".
That package statement determines the fully qualified class name
(or "full package name") for the class represented by that file. If the
source code file contains the package statement
then the class file "C:\two\three\two\Plum.class" represents the class with
fully qualified name (full package name) two.Plum. If that source file
contains the package statement
then the class file "C:\two\three\two\Plum.class" represents the class with
full package name three.two.Plum. If the source file contains the package
statement
then the class file "C:\two\three\two\Plum.class" represents the class with
full package name two.three.two.Plum. If the source file does not have a
package statement, then the class file "C:\two\three\two\Plum.class"
represents the class with full package name Plum (the same as its
"simple name").
Notice that the package statement in the source file need not correspond to any relative path name for the source file.
Notice how we are making a careful distinction between "class file name" and "class name". When we work with Java, sometimes we need to use a name for a "class file" and sometimes we need to use a name for a "class". The distinction is subtle and can be confusing.
Here is a very important difference between "class file names" and "class
names". We have seen that every file, including every class file, has several
relative file names. But a class has only two names (simple and qualified),
and there is no such thing as a "relative class name". If a class has the name
three.five.Strawberry, then five.Strawberry is meaningless. It does NOT
identify the class but starting from a current package (like relative file
name starting from a current directory). Every class has only two names, its
fully qualified name and its simple name. Whenever Java requires a class name,
it almost always requires the fully qualified name (the exception is when a
source code file contains an appropriate import statement and then you can
use simple class names in that source file). Whenever Java requires a class
file name, we can use either a full path file name or any valid relative
file name.
Also, remember that:
- A class file name always ends with the extension ".class".
- A class name never uses an extension.
Here is a list of several kinds of names used in the Java system (the Java language and all the Java command-line utilities). Next to each kind of name is a list of places where that kind of name is used.
1) source file name  :  javac, javadoc, jar commands
2) class file name   :  jar command
3) class name        :  java command, import statements
4) package name      :  javadoc command, package statement, import statement
5) folder name       :  class-path
6) jar file name     :  class-path, jar command
In the Java system, whenever you use a file name (source file name, class file name, jar file name, folder name) you can use the file's fully qualified name or any valid relative path name.
And remember that there is no such thing as a "relative class name" or a "relative package name". Package names are always fully qualified. Class names are either fully qualified or simple (when there is an appropriate import statement).
Here is information about file names.
- Path
- Filename
- Filename extension
- What is a full path name?
- What are the differences between absolute and relative paths?
- Fully qualified name
Here is information about Java class names.
1.17.6 Examples
Now let us see how we can use this information to help us understand Java's classpath.
We use the classpath parameter in the javac compiler command and the java
virtual machine command.
We need to tell the compiler program what source file to compile and where to find all the classes referred to by that source file.
We need to tell the Java virtual machine command what class to run and where to find all the other classes that are needed.
Here is a summary of what we need to tell each command.
    javac -cp folders;containing;packages  relative/path/to/SourceFile.java
    java  -cp folders;containing;packages  fully.qualified.ClassName
Notice how the classpath is a list of folder names (not a list of package names). The compiler needs the name of a source file. The JVM needs the name of a class (not a class file).
When you include a folder name in a Java classpath, the Java compiler or JVM will find any class whose full package name begins directly under that folder (not with that folder).
Consider this folder structure.
If the file representing class one.two.Three is placed in folder "one/two",
and we want to execute the class, then
If the file representing the class two.Three is placed in folder "one/two",
then
      one> java -cp .   two.Three  # works,
      one> java -cp ..  two.Three  # does not work,
  one/two> java -cp .   two.Three  # does not work,
  one/two> java -cp ..  two.Three  # works.
Here is the source code for the file "Three.java" (you can switch between the two package statements).
Here is another example. Consider this folder structure.
Here is the source code for the file "Six.java".
To compile and run the program "Six.java" we can use these two command-lines from the directory "one".
If we start with the current directory "one\two\three\four\five", then we compile and run "Six.java" with these two command-lines.
Notice a very subtle aspect of the java and javac commands. The name at
the end of a java command-line is not the name of a file, it is the name of
a class (for example four.five.Six), and that class must be in the classpath.
On the other hand, the name at the end of the javac command-line must be a
Java source file, and it doesn't need to be in the classpath because it is a
text file, not a class. We can give the javac command the full path name, or
a (valid) relative path name, of a source file and it will find the file. But
we must always give the java command the full package name of a class and
then make sure that class is in the classpath (and remember, there is no such
thing as a "relative class name").
If you want to see more examples using packages and classpaths, look at the code in the following zip file.
If you want to try solving some puzzles using packages and classpaths, try solving the problems in the following zip file.
There is more to learn about how the Java compiler finds and compiles Java classes. For example, we have not yet said anything about jar files. Later we will see how, and why, we use jar files.
- Understanding Packages
- Creating and Using Packages
- Questions and Exercises: Creating and Using Packages
- Unnamed Packages
- Classpath
- How Classes are Found
- Using JAR Files: The Basics
- JAR file format
- jar command
1.18 Build System
Any project as large as this renderer will need some kind of "build system".
The renderer has over 100 Java source files. To "build" the renderer we need to produce a number of different "artifacts" such as class files, HTML Javadoc files, jar files. We do not want to open every one of the 100 or so Java source code files and compile each one. We need a system that can automatically go through all the sub folders of the renderer and compile every Java source file to a class file, produce the Javadoc HTML files, and then bundle the results into jar files.
Most Java projects use a build system like Maven, Gradle, Ant, or Make.
In this course we will use a much simpler build system consisting of
command-line script files (cmd files on Windows and bash files on
Linux). We will take basic Java command-lines and place them in the
script files. Then by running just a couple of script files, we can
build all the artifacts we need.
We will write script files for compiling all the Java source files (using
the javac command), creating all the Javadoc HTML files (using the javadoc
command), running individual client programs (using the java command), and
bundling the renderer library into jar files (using the jar command). We
will also write script files to automatically "clean up" the renderer folders
by deleting all the artifacts that the build scripts generate.
Here are help pages for the command-line tools that we will use.
- The Core JDK Tools
- javac - The Compiler
- java - Your Application Launcher
- javadoc - The Documentation Generator
- jar - The Archive Tool
- jshell - The Java Shell Tool
Be sure to look at the contents of all the script files. Most are fairly simple. Understanding them will help you understand the more general build systems used in industry.
There are two main advantages of using such a simple build system.
- No need to install any new software (we use Java's built-in tools).
- It exposes all of its inner workings (nothing is hidden or obscured).
Here are well known build systems used for large projects.
Here is some documentation on the Windows cmd command-line language
and the Linux bash command-line language.
1.18.1 Building class files
Here is the command line that compiles all the Java files in the
renderer.scene package.
This command-line uses the Java compiler command, javac. The javac command,
like almost all command-line programs, takes command-line arguments (think of
"command-line programs" as functions and "command-line arguments" as the
function's parameters). The "-g" is the command-line argument that tells the
compiler to produce debugging information so that we can debug the renderer's
code with a visual debugger. The "-Xlint" is the command-line argument that
tells the compiler to produce all possible warning messages (not just error
messages). The "-Xdiags:verbose" command-line argument tells the compiler to
put as much information as it can into each error or warning message. The
final command-line argument is the source file to compile. In this command-line
we use file name globbing to compile all the ".java" files in the "scene"
folder.
There are a large number of command-line arguments that we can use with the
javac command. All the command-line arguments are documented in the help
page for the javac command.
- javac - The Compiler
- The javac Command
- What is file globbing?
- glob
- How-to: Match filenames with Wildcards
The script file "build_all_classes.cmd" contains a command-line like the above one for each package in the renderer. Executing that script file compiles the whole renderer, one package at a time.
Two consecutive lines from "build_all_classes.cmd" look like this.
    javac -g -Xlint -Xdiags:verbose  renderer/scene/*.java             &&^
    javac -g -Xlint -Xdiags:verbose  renderer/scene/primitives/*.java  &&^
The special character "^" at the end of a line tells the Windows operating system that the current line and the next line are to be considered as one single (long) command-line. The operator "&&" tells the Windows operating system to execute the command on its left "and" the command on its right. But just like the Java "and" operator, this operator is short-circuited. If the command on the left fails (if it is "false"), then do not execute the command on the right. The effect of this is to halt the compilation process as soon as there is a compilation error. Without the "&&^" at the end of each line, the "build_all_classes.cmd" script would continue compiling source files even after one of them failed to compile, and probably generate an extraordinary number of error messages. By stopping the compilation process at the first error, it becomes easier to see which file your errors are coming from and prevent spurious false compilation errors.
The script files in the "clients_r1" folder are a bit different. For example, the script file "build_all_clients.cmd" contains the following command-line.
Since the "renderer" folder is in the directory above the "clients_r1" folder,
this javac command needs a classpath. The ".." sets the classpath to the
directory above the current directory (where the "renderer" folder is).
The script file "build_&_run_client.cmd" lets us build and run a single client
program (a client program must have a static main() method which defines the
client as a runnable program). This script file is different because it takes
a command-line argument which is the name of the client program that we want
to compile and run. The script file looks like this.
Both the javac and the java commands need a classpath with ".." in it
because the "renderer" folder is in the folder above the current folder,
"clients_r1". The java command also needs "." in its classpath because
the class we want to run is in the current directory. The "%1" in the
javac command represents the script file's command-line argument (the
Java source file to compile). The "%~n1" in the java represents the name
from the command-line argument with its file name extension removed. If
"%1" is, for example, "ThreeDimensionalScene_R1.java", then "%~n1" is that
file's basename, "ThreeDimensionalScene_R1". The command-line
will compile and then run the "ThreeDimensionalScene_R1.java" client program.
You can also use your mouse to "drag and drop" the Java file "ThreeDimensionalScene_R1.java" onto the script file "build_&_run_client.cmd". Be sure you try doing this to make sure that the build system works on your computer.
1.18.2 Documentation systems and Javadoc
Any project that is meant to be used by other programmers will need documentation of how the project is organized and how its code is supposed to be used. All modern programming languages come with a built-in system for producing documentation directly from the project's source code. The Java language uses a documentation system called Javadoc.
Javadoc is a system for converting your Java source code files into HTML
documentation pages. As you are writing your Java code, you add special
comments to the code and these comments become the source for the Javadoc
web pages. The Java system comes with a special compiler, the javadoc
command, that compiles the Javadoc comments from your source files into
web pages. Most projects make their Javadoc web pages publicly available
using a web server (many projects use GitHub for this).
Here is the entry page to the Javadocs for the entire Java API.
Here is the Javadoc page for the java.lang.String class.
Compare it with the source code in the String.java file.
In particular, look at the Javadoc for the subString() method.
Compare the method's Javadoc with the method's source code.
- https://github.com/openjdk/jdk21/blob/master/src/java.base/share/classes/java/lang/String.java#L2806
Look carefully at the method's source code to see how it constructs the different parts in the method's Javadoc.
Here is some documentation about the Javadoc documentation system.
- Appendix B: Javadoc
- The javadoc Tool
- Javadoc - the Documentation Generator
- The javadoc Command
- How to Write Doc Comments for the Javadoc Tool
- Appendix B: Documentation Comments
Here are what documentation systems look like for several modern programming languages.
- The JavaScript language use a system called JSDoc, https://jsdoc.app
- The TypeScript language uses a system called TSDoc, https://tsdoc.org
- The Python language uses a system called Sphinx, https://www.sphinx-doc.org/en/master/
- The Go language uses a system called Godoc, https://go.dev/blog/godoc
- The Rust language uses a system called rustdoc, https://doc.rust-lang.org/rustdoc/
- The Haskell language uses a system called Haddock, https://haskell-haddock.readthedocs.io
1.18.3 Building the Javadoc files
The script file "build_all_Javadocs.cmd" uses the javadoc command to create
a folder called "html" and fill it with the Javadoc HTML files for the whole
renderer. The javadoc command is fairly complex since it has many options
and it has to list all the renderer's packages on a single command-line.
javadoc -d html -Xdoclint:all,-missing -link https://docs.oracle.com/en/java/javase/21/docs/api/ -linksource -quiet -nohelp -nosince -nodeprecatedlist -nodeprecated -version -author -overview renderer/overview.html -tag param -tag return -tag throws renderer.scene renderer.scene.primitives renderer.scene.util renderer.models_L renderer.models_L.turtlegraphics renderer.pipeline renderer.framebuffer
You should use the javadoc command's help page to look up each command-line
argument used in this command and see what its purpose is. For example, what
is the meaning of "-Xdoclint:all,-missing"? What is the purpose of "-d"?
After the Javadoc files are created, open the "html" folder and double click on the file "index.html". That will open the Javadoc entry page in your browser.
1.18.4 Jar files
Jar files are an efficient way to make large Java projects available to other programmers.
If we want to share the renderer project with someone, we could just give them all the folders containing the source code and then they could build the class files and the Javadocs for themselves. But for someone who just wants to use the library, and is not interested in how it is written, this is a bit cumbersome. What they want is not a "source code distribution" of the project. They want a "binary distribution" that has already been built. But they do not want multiple folders containing lots of packages and class files. That is still too cumbersome. They would like to have just a single file that encapsulates the entire project. That is what a jar file is.
A jar file (a "java archive") is a file that contains all the class files from a project. A jar file is really a zip file. That is how it can be a single file that (efficiently) contains a large number of files. If you double click on the script file "build_all_classes.cmd" and then double click on "build_jar_files.cmd", that will create the file "renderer_1.jar". Try changing the ".jar" extension to a ".zip" extension. Then you can open the file as a zip file and see all the class files that are in it.
The script file "build_jar_files.cmd" uses the jar command to build two jar
files, one containing the renderer's compiled binary class files and the other
containing the renderer's source code files.
Here is the command-line that builds the "renderer_1.jar" file. The jar
command, like the javadoc command, is long because it needs to list all
the renderer packages on a single command-line. This command-line assumes
that you have already build all of the renderer's class files (notice the
use of "file name globbing").
jar cvf renderer_1.jar renderer/scene/*.class renderer/scene/primitives/*.class renderer/scene/util/*.class renderer/models_L/*.class renderer/models_L/turtlegraphics/*.class renderer/pipeline/*.class renderer/framebuffer/*.class
Use the jar command's help page to look up each command-line argument used
in this command. For example, what is the meaning of "cvf"? (That command-line
argument is actually three options to the jar command.)
The way the jar command handles options may seem a bit strange. The Java
jar command is actually based on the famous Linux/Unix tar command (the
"tape archive" command). The way the options are processed is explained in
the tar man-page.
1.18.5 Jar files and the classpath
When you include a folder in Java's classpath, the Java compiler, or Java Virtual Machine, will find any packages that you put in that folder. But, a bit surprisingly, the compiler and the JVM will ignore any jar files in that folder. If you want the compiler, or the JVM, to find packages that are inside of a jar file, then you need to explicitly add the jar file to the classpath.
Earlier we define the classpath as a list of folder names. Now we can say that the classpath is a list of folder names and jar file names.
Let's consider an example of using a jar file. Use the script file "build_jar_files.cmd" to build the "renderer_1.jar" file. Then create a folder called "jar-example" (anywhere in your computer's file system) and place into that folder the "renderer_1.jar" file and the "ThreeDimensionalScene_R1.java" file from this renderer's "clients_r1" folder.
The jar file provides all the information that we need to compile and run the
renderer's client program "ThreeDimensionalScene_R1.java". Open a command-line
prompt in your "jar-example" folder. Compile the source file using this
classpath in the javac command-line.
Then run the client program using this classpath in the java command-line.
Notice the slight difference in the classpath for the javac and java
commands. For javac, since we are specifying the source file on the
command-line, and all the needed class files are in the jar file, we
do not need the current directory in the classpath. But in the java
command, we need all the class files in the jar file AND we need the
one class file in the current director, so we need the current directory
in the classpath. One very subtle aspect of the java command is that the
name "ThreeDimensionalScene_R1" is NOT the name of a file, it is the name
of a class, and that class needs to be in the classpath. Another way to
think about this is that javac commands needs the name of a Java source
file but the java command needs the name of a "class* (not a class file!).
We can give the javac command the full path name or a (valid) relative path
name of a source file and it will find the file. But we must give the java
command the full package name of a class (not the full path name of the file
that holds the class, that will never work) and make sure that the class is
in the classpath.
1.18.6 Jar files and VS Code
The "renderer_1.jar" file can be used by the VS Code editor so that the IDE can compile programs that use the renderer library (like your homework assignments).
Do this experiment. Open another command-line prompt in the "jar-example" folder that you created in the last section. Type this command to start VS Code in the "jar-example" folder.
This command-line is read as "code here" or "code dot". This command tells the Windows operating system to start the VS Code editor in the current directory. This makes VS Code open the directory as a project.
Find the file "ThreeDimensionalScene_R1.java" in the left hand pane of VS Code. After you open "ThreeDimensionalScene_R1.java" you will see that it is filled with little red squiggly lines that mean that the classes cannot be found. VS Code does not (yet) know how to find classes from the renderer. But all those classes are in the jar file "renderer_1.jar" in the folder with the file "ThreeDimensionalScene_R1.java". But VS Code does not (yet) know that it should use that jar file. We need to configure the classpath that is used by VS Code. Near the bottom of VS Code's left pane look for and open an item called "JAVA PROJECTS". In its "Navigation Bar" click on the "..." item (labeled "More Actions...") and select "Configure Classpath". Here is a picture.
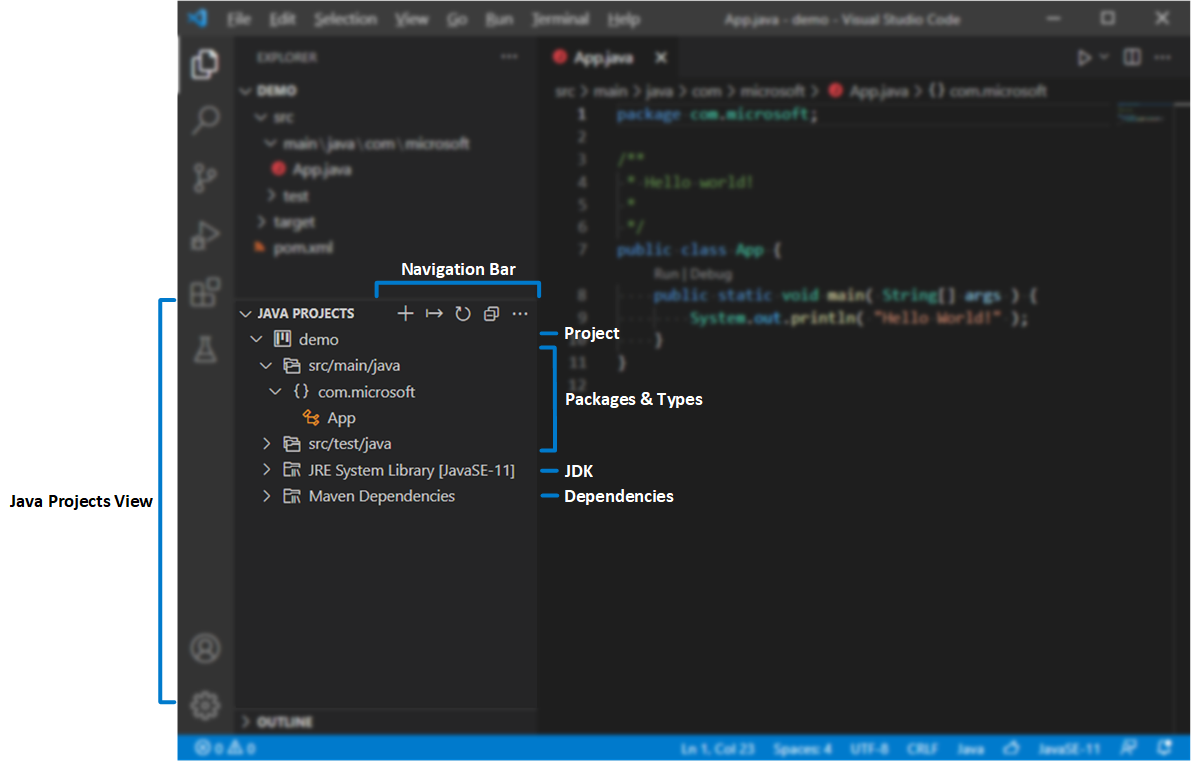
When the "Configure Classpath" window opens, click on the "Libraries" tab. Click on "Add Library..." and select the "renderer_1.jar" file to add it to the VS Code classpath.
After you add "renderer_1.jar" to VS Code's classpath, go back to the "ThreeDimensionalScene_R1.java" file. All the little red squiggly lines should be gone and you should be able to build and run the program.
The actions that you just took with the VS Code GUI had the effect of creating a new subfolder and a new configuration file in the "jar-example" folder. Open a File Explorer window for the "jar-example" folder and you should now see a new sub-folder called ".vscode" that contains a new file called "settings.json".
The "settings.json" file holds the new classpath information for VS Code. Here is what "settings.json" should look like.
You can actually bypass the GUI configuration steps and just create this folder and config file yourself. Many experienced VS Code users directly edit their "settings.json" file, using, of course, VS Code. Try it. Use VS Code to look for, and open, the "settings.json" file.
Now do another experiment. In VS Code, go back to the ThreeDimensionalScene_R1.java
file and hover your mouse, for several seconds, over the setColor() method
name in line 37. You should get what Microsoft calls an IntelliSense tool tip
giving you information about that method (taken from the method's Javadoc).
But the tool tips do not (yet) work for the renderer's classes. The VS Code
editor does not (yet) have the Javadoc information it needs about the
renderer's classes.
The "build_jar_files.cmd" script file created a second jar file called "renderer_1-sources.jar". This jar file holds all the source files from the renderer project. This jar file can be used by VS Code to give you its IntelliSense tool-tip information and code completion for all the renderer classes.
Copy the file "renderer_1-sources.jar" from the "renderer_1" folder to the "jar-example" folder.
    \---jar-example
        |   renderer_1-sources.jar
        |   renderer_1.jar
        |   ThreeDimensionalScene_R1.java
        |
        \---.vscode
                settings.json
You may need to quit and restart VS Code, but VS Code should now be able to give you Javadoc tool tips when you hover your mouse (for several seconds) over any method from the renderer's classes.
NOTE: You usually do not need to explicitly add the "renderer_1-sources.jar" file to the VS Code classpath. If you have added a jar file to VS Code, say "foo.jar", then VS Code is supposed to also automatically open a jar file called "foo-sources.jar" if it is in the same folder as "foo.jar".
FINAL NOTE: DO all the experiments mentioned in the last two sections. The experience of doing all these steps and having to figure out what you are doing wrong is far more valuable than you might think!
- Managing Java Projects in VS Code
- Configure classpath for unmanaged folders
- VS Code, Java Extension, how to add a JAR to classpath?
If you are on the PNW campus, then you can download the following book about VS Code (you have permission to download the book, for free, while on campus because of the PNW Library).
1.18.7 Build system summary
Every programming language needs to provide tools for working on large projects (sometimes referred to as "programming in the large").
A language should provide us with
- a system for organizing our code,
- a system for documenting our code,
- a system for building our code's artifacts,
- a system for distributing those artifacts.
For this Java renderer project we use
- classes and packages,
- Javadocs and Readmes,
- command-line scripts,
- jar files and zip files.
If you want to see more examples using packages, classpaths, and jar files, look at the code in the following zip file.
If you want to try solving some puzzles using packages, classpaths, and jar files, try solving the problems in the following zip file.
When you learn a new programming language, eventually you get to the stage where you need to learn the language's tools for supporting programming in the large. Learn to think in terms of how you would organize, document, build, and distribute a project.
- Programming in the large and programming in the small
- Packaging and Shipping Code
- Best Practices for Coding, Organization, and Documentation
1.19 JShell, the Java shell
An effective way to understand Java code is to execute the code interactively using the Java Shell program. The Java Shell (jshell.exe) lets us run one line of Java code at a time and immediately see the line's results. This gives us a way to experiment with individual lines of code, to see the effect that each line of code has.
- jshell - The Java Shell Tool
- JShell
- JShell, the Java REPL
- Interactive Java programming (REPL) with JShell, Part 1
- Introduction to JShell, Javaa's REPL for Interactive Java
- Introduction to JShell
- JShell: Read-Evaluate-Print Loop for the Java Platform
- Chapter 23, Java Shell (PDF) from Beginning Java 17 Fundamentals
- The jshell Command
Open a command-prompt window and on the command-line type the following command.
You should see a response that looks something like this.
At the jshell prompt, type the following line of Java code. You should
immediately see the results from this for-loop.
At the next jshell prompt, tap your keyboard's "up arrow" key to recall
the last line of code. Use the left and right arrow keys to move around in
the line and make some changes. Then tap the Enter key to execute your
new for-loop.
You can also type a "block" of code into the JShell prompt. Copy and paste the following block of four lines of code all at once into a JShell prompt. Notice how JShell changes the prompt for the second, third, and fourth lines of code in the block.
Here is an "incomplete" block of code. Copy and paste all three lines of
code all at once into a JShell prompt and tap the Enter key. Notice that
JShell promputs you with the new kind of prompt, waiting for you to complete
the incomplete block of code.
Find a way to complete the block so that it compiles and runs.
To remind ourselves of the code we have typed into the jshell prompt,
use the following JShell command.
Commands like /list and /help are JShell commands. They are distinct
from the Java language. We use JShell commands to manipulate the JShell
environment. To see a list of the JShell commands, type a / character
followed by tapping the Tab key (and you do not need to tap the Enter key).
The Tab key is the "auto complete" key. It tells JShell to try and complete
whatever you have typed so far. For example, try typing this.
That gives you a list of all the static methods in the Math class. The
following will list the static methods from the Math class that begin
with a.
On the other hand, the following will show you the Javadoc for the Math
class (notice that there is no . after the class name). If you keep on
tapping the Tab key, you can step through the Javadoc pages.
Create a String variable.
The following will show you all the String methods that you can call on
that variable.
How would you read the Javadocs for the String class?
The following will show you all the classes in the java.io package.
When you want to quit the JShell program, use the /exit command.
1.19.1 JShell and Java script files
A Java source file has the extension ".java" and it contains a Java class definition. A ".java" file cannot contain just a "snippet" of Java code, like a for-loop. A for-loop must be put in the definition of a method which must be put in the definition of a class. The JShell program lets us run a snippet of Java code without having to put it in a method or a class. Java "script files" lets us store snippets of Java code in a source file and then execute that source file using JShell.
A Java script file is a text file with the ".jsh" extension. Java script files can be executed using the JShell command. Anything that you can type at the JShell prompt can be placed in a ".jsh" file. (And "Java script files" are not at all the same as "JavaScript files".)
To run a Java shell script, you open a command-prompt window in the folder that contains the script file and on the command-line type a command like the following.
That causes JShell to execute every line of code in the "experiment.jsh" script file.
For example, open a command-line prompt in any folder that you choose and create a file in that folder called "experiment.jsh" with the following content.
At the command-line prompt in that folder, execute this command-line.
That should run the code in the script file, but it does not produce any output in the console window. JShell runs script files "silently", without printing any results in the console window. When the script file has finished executing, JShell prompts you with an empty prompt. You can ask JShell what lines of code were executed from the script file using this JShell command.
You can verify that the script executed by checking the values of the variables
names and sorted
What is really useful is that when JShell gets to the end of a script's code, JShell does not quit. It pauses and gives us a prompt from which we can continue entering more Java code. For example, you can add a new name to the list of names.
You can resort the list of names by using the up-arrow key to recall the line
of code that executed the sorted() method (try it).
You can convert the List object into an array.
One small thing to notice is that when you ran the "experiment.jsh" script file using JShell, that did not produce an "experiment.class" file. Script files are not compiled in the usual way. The code in the script file does get compiled, but not into a class file. The code is compiled directly into a class stored in the Java Virtual Machine's memory.
Putting lines of Java code in a JShell script file, executing the script, and
then experimenting with the code using the jshell prompt, is a sophisticated
and effective way to learn about the Java language.
1.19.2 JShell and the renderer
We can use JShell to execute code that uses the renderer, but first we need to put the renderer packages in a jar file and then put that jar file into JShell's classpath.
Let us see how to do this from the "renderer_1" folder.
Open a command-line prompt in the "renderer_1" folder. Compile all the code in the renderer packages.
Next, build the renderer's jar file.
We can now delete the renderer's class files.
Now start JShell with the renderer's jar file in the classpath.
Test that JShell can use the renderer's jar file by typing the following
line of code. This line should print out a small FrameBuffer object.
1.19.3 Java script files and the renderer
We can run script files that use the renderer. This assumes that the renderer's jar files are in the same directory as the script file.
If the renderer's jar files are in the "renderer_1" folder along with the script file "test_renderer_r1.jsh" then here is how we can run that script file in JShell using the renderer.
We can also start JShell first, with the renderer in its classpath, and then
run the script file from within JShell using JShell's /open command.
We can even start JShell without a classpath, then add the renderer's jar
file to JShell's environment using JShell's /env command, and then run
the script file using the /open command.
Each way of running a script file has its advantages.
Exercise: Create a new, empty folder anywhere in your file system. Put the renderer's jar files into that folder (but not any of the renderer's source files or class files). In that folder create an "experiment.jsh" script file containing the following code. Make sure that you can run the script file all three ways.
1.20 Logging and Debugging
One of the features of the rendering pipeline is that it can log detailed information about all the algorithmic steps that it is taking in each pipeline stage.
Logging is implemented in the "PipelineLogger.java" file in the
renderer.pipeline package. The implementation of logging depends on
the implementation of a toString() method in every class from the
renderer.scene package (see
Section 1.8.3).
We turn on and off pipeline logging by setting a couple of boolean variables.
The static field debug in the Scene class turns on and off logging for a
Scene object. The static field debug in the pipeline.Rasterize class
turns on and off logging of the rasterizer pipeline stage. The logging of
rasterization produces a lot of output, so even when we want logging turned
on, we usually do not want to log the rasterization stage.
Here is a small program that turns on pipeline logging, including rasterization logging. Notice that the scene has just one model and it contains just a single (short) line segment.
Here is this program's logging output from its console window. Notice how
each Position tells us its translation Vector. Trace the coordinates
of the two vertices as they pass through the first three pipeline stages,
from model coordinates to camera coordinates, then to image-plane coordinates,
then to pixel-plane coordinates. Look at how the single line segment gets
rasterized. Notice that it is blue at one end, red at the other end, and
purple in the middle. This line segment has v0 to the right of v1, but
we rasterize lines from left to right, so this line is rasterized "in the
reversed direction".
== Begin Rendering of Scene: SimpleScene
-- Current Camera:
Camera:
perspective = true
==== Render position: p0
------ Translation vector = [x,y,z] = [   1.00000     1.00000    -6.00000]
====== Render model: SimpleModel
0. Model      : vIndex =   0, (x,y,z) = (   0.50000     0.50000     0.50000)
0. Model      : vIndex =   1, (x,y,z) = (  -0.50000    -0.50000    -0.50000)
1. Camera     : vIndex =   0, (x,y,z) = (   1.50000     1.50000    -5.50000)
1. Camera     : vIndex =   1, (x,y,z) = (   0.50000     0.50000    -6.50000)
2. Projected  : vIndex =   0, (x,y,z) = (   0.27273     0.27273    -1.00000)
2. Projected  : vIndex =   1, (x,y,z) = (   0.07692     0.07692    -1.00000)
3. Pixel-plane: vIndex =   0, (x,y,z) = (  64.13636    64.13636     0.00000)
3. Pixel-plane: vIndex =   1, (x,y,z) = (  54.34615    54.34615     0.00000)
3. Pixel-plane: LineSegment: ([0, 1], [0, 1])
3. Pixel-plane: cIndex =   0, java.awt.Color[r=255,g=0,b=0]
3. Pixel-plane: cIndex =   1, java.awt.Color[r=0,g=0,b=255]
4. Rasterize: LineSegment: ([0, 1], [0, 1])
   vIndex =   0, (x,y,z) = (  64.13636    64.13636     0.00000)
   vIndex =   1, (x,y,z) = (  54.34615    54.34615     0.00000)
   cIndex =   0, java.awt.Color[r=255,g=0,b=0]
   cIndex =   1, java.awt.Color[r=0,g=0,b=255]
Snapped to (x0_pp, y0_pp) = (  64.0000,   64.0000)
Snapped to (x1_pp, y1_pp) = (  54.0000,   54.0000)
Rasterize along the x-axis in the reversed direction.
Slope m    = 1.0
Slope mRed = 0.1
Slope mGrn = 0.0
Slope mBlu = -0.1
Start at (x0_vp, y0_vp) = (  53.0000,   46.0000)
  End at (x1_vp, y1_vp) = (  63.0000,   36.0000)
    fb_[w=100,h=100] vp_[x=   0, y=   0, w=100,h=100]  (x_pp=  54, y_pp=  54.0000)  (x_vp=  53, y_vp=  46)  r=0.0000 g=0.0000 b=1.0000
    fb_[w=100,h=100] vp_[x=   0, y=   0, w=100,h=100]  (x_pp=  55, y_pp=  55.0000)  (x_vp=  54, y_vp=  45)  r=0.1000 g=0.0000 b=0.9000
    fb_[w=100,h=100] vp_[x=   0, y=   0, w=100,h=100]  (x_pp=  56, y_pp=  56.0000)  (x_vp=  55, y_vp=  44)  r=0.2000 g=0.0000 b=0.8000
    fb_[w=100,h=100] vp_[x=   0, y=   0, w=100,h=100]  (x_pp=  57, y_pp=  57.0000)  (x_vp=  56, y_vp=  43)  r=0.3000 g=0.0000 b=0.7000
    fb_[w=100,h=100] vp_[x=   0, y=   0, w=100,h=100]  (x_pp=  58, y_pp=  58.0000)  (x_vp=  57, y_vp=  42)  r=0.4000 g=0.0000 b=0.6000
    fb_[w=100,h=100] vp_[x=   0, y=   0, w=100,h=100]  (x_pp=  59, y_pp=  59.0000)  (x_vp=  58, y_vp=  41)  r=0.5000 g=0.0000 b=0.5000
    fb_[w=100,h=100] vp_[x=   0, y=   0, w=100,h=100]  (x_pp=  60, y_pp=  60.0000)  (x_vp=  59, y_vp=  40)  r=0.6000 g=0.0000 b=0.4000
    fb_[w=100,h=100] vp_[x=   0, y=   0, w=100,h=100]  (x_pp=  61, y_pp=  61.0000)  (x_vp=  60, y_vp=  39)  r=0.7000 g=0.0000 b=0.3000
    fb_[w=100,h=100] vp_[x=   0, y=   0, w=100,h=100]  (x_pp=  62, y_pp=  62.0000)  (x_vp=  61, y_vp=  38)  r=0.8000 g=0.0000 b=0.2000
    fb_[w=100,h=100] vp_[x=   0, y=   0, w=100,h=100]  (x_pp=  63, y_pp=  63.0000)  (x_vp=  62, y_vp=  37)  r=0.9000 g=0.0000 b=0.1000
    fb_[w=100,h=100] vp_[x=   0, y=   0, w=100,h=100]  (x_pp=  64, y_pp=  64.0000)  (x_vp=  63, y_vp=  36)  r=1.0000 g=0.0000 b=0.0000
====== End model: SimepleModel
==== End position: p0
== End Rendering of Scene.
The renderer's logging output can be a tool for debugging a graphics program that does not draw what you think it should. For example, suppose your program generates a blank image showing no models. If you turn on the renderer's logging, you can see if the renderer really did render the models you wanted. Maybe every line segment was rendered, but got clipped off. Maybe you are drawing white line segments on a white framebuffer. Maybe your models are so far away from the camera that they render to just a few pixels in the framebuffer. You can see this kind of information in the log output even when you can't see any results in the framebuffer's image.
Logging is based on every class in the renderer packages implementing a
toString() method. The logging methods in "PipelineLogger.java" depend on
Vertex and LineSegment (and every other class from the renderer) objects
knowing how to provide a good String representation of themselves. In
particular, the Scene class has a toString() method that provides a
good representation of the entire scene data structure. One useful, simple,
debugging technique is to print out the String representation of a scene
object and see if it looks reasonable.
Similarly, you can print the String representation of any Model object that
is causing you problems. Even the FrameBuffer and Viewport classes implement
a toString() method, but they are not as useful as all the other toString()
methods.
1.20.1 Logging and System.out
When we turn on the renderer's logging, it can produce a huge amount of console
output. Normally, Java console output is very slow, so you might expect console
logging to unreasonably slow down the renderer. To solve this problem, the
PipelineLogger class reconfigures the PrintStream object used by System.out.
Here is how PipelineLogger sets System.out. It creates a PrintStream
object that uses a reasonably sized output buffer, and it turns off line
flushing.
This creates a System.out that is very fast, but can be a bit confusing to
use. This version of System.out only flushes itself when the buffer is full.
If you print some text using the System.out.println() method, you might be
surprised that your text never gets printed. When we use this version of
System.out, we need to call the flush() method after every print()
method.
Here is how Java initially creates the PrintStream for System.out. There
is no output buffer and line flushing is turned on. This results in a very
slow, but very reliable and easy to use, System.out.
Here is a short program that demonstrates the timing difference between the
two System.out configurations. The buffered output should be quite a bit
more than 10 times faster than the unbuffered output.
- java.io.PrintStream
- java.lang.System class, field summary
- java.lang.System.setOut(Printstream)
- java.io.FileDescriptor
- java.io.PrintStream.flush()
When the renderer produces a large amount of logging output, there is another issue that we should be aware of. The console window has a vertical scroll bar that lets us scroll up and down the lines of output in the console window. But the console window has a limit on the number of lines that it will allow us to scroll through. This limit is called the console's history size. The number of lines produced by the renderer's logging might be greater than the console's history size. If that is the case, then we lose some of the renderer's logging output. But the console window's history size can be increased (up to 32,000 lines). In order to make sure that you always see all the logging output from the renderer, it is a good idea to change the history size for the console windows on your Windows computer. Here are a couple of links on how to do that, along with some basic information about the Windows Terminal console program.
- Increase buffer size in the new Windows Terminal
- Windows Terminal History size
- What is Windows Terminal?
- Windows Terminal, Console and Command-Line repo
When the renderer produces a lot of logging output, there is another way
to make sure that we can see all of it. We can redirect the renderer's
output to a file. I/O-redirection is an important concept for using the
command-line. The following command-line "re-directs" all of the running
program's output from the console window (where it usually goes) to a file
named log.txt (if that file does not exist, this command creates it; if
that file already exits, this command replaces it).
The advantage of I/O-redirection is that you get a permanent record of the program's output. You can open it in a text editor and search it. You can run the program twice and compare (captured) outputs.
One slight disadvantage of I/O-redirection is that while the programming is
running you get no visual feedback of what the program is doing. And you
need to watch out for a program that is in an infinite loop, because it's
captured output could fill up your storage device. When I use I/O-redirection,
if the program runs for too long, I monitor the size of the output file
(like log.txt in the above example) and kill the running program (using
Task Manager) if the output file becomes too large.
1.20.2 Graphviz and Scene graphs
The purpose of logging (and toString() methods) is to help us debug our
programs and to also expose the inner workings of both the renderer algorithms
and the Scene data structure. The renderer has another tool to help us debug
programs and also see how the renderer works. The renderer can draw detailed
pictures of the graph defined by a Scene data structure.
Earlier in this document we mentioned that the Scene data structure defines
a tree data structure and we drew ascii-art pictures of several Scene data
structures. The renderer has a built-in way to generate a sophisticated tree
diagram for any Scene data structure.
The renderer has a class,
that contains a draw() method.
This method takes a reference to a Scene data structure and writes a file
containing a description of the Scene. The description that is stored in
the file is written in a language called dot. A dot language file can
be processed by a program called Graphviz to produce a PNG image file
of the graph described by the contents of the dot file.
The draw() method in DrawSceneGraph writes the dot language file
describing a Scene object and then the method also starts up the GraphViz
program (called dot.exe) to translate the dot file into a PNG image file.
But this assumes that you have the GraphViz program installed on your
computer. Graphviz is not part of Windows, so you need to download and
install it.
Go to the Graphviz download page,
and download the "ZIP archive" of the latest Windows version of Graphviz.
Unzip the archive and copy it to your "C:\" drive so that you have the
following folder structure (the draw() method in DrawSceneGraph
expects this exact folder structure with the names as shown here).
You can test your installation of Graphviz by compiling and running the following program.
The draw() method in DrawSceneGraph can draw different versions
of the scene tree, showing different amounts of detail. The
"ThreeDimensionalScene_R1.java" program draws three versions of its
tree.
After you run "ThreeDimensionalScene_R1.java", notice that it created three
".dot" files, three ".png" files, and one ".ppm" file. The ".dot" files are
the input files to GraphViz, which outputs the three ".png" files picturing
the tree data structure of the scene object. The ".ppm" file is the picture
of the scene rendered by the renderer in a FrameBuffer object.
You can also test your installation of Graphviz by running the following code in JShell from the "renderer_1" folder with "renderer_1.jar" in JShell's classpath.
1.20.3 CheckModels class
The renderer has one more tool to help us debug our graphics programs.
The renderer has a class,
that contains a check() method,
that takes a reference to a Model data structure and checks that data
structure for some simple mistakes that you might make.
This method is automatically called, by the Pipeline.render() method, on
all of the models from a Scene whenever we render the Scene.
The check() method first checks that you have non-empty lists of vertices,
colors, and primitives. Then the check() method checks that every Primitive
in your Model uses Vertex and Color indices that are valid. If the
check() method finds a problem, it prints a warning message to the
console window.
Of course, any invalid index in a Primitive will eventually cause the
renderer to throw an "index out of bounds" exception. But when the renderer
crashes, trying to figure out why it crashed can be difficult. The purpose
of the check() method is to let you know, as early as possible, that there
is some kind of problem in your Model object. If you fix that problem right
away, then you will have avoided a possibly difficult and painful debugging
session.
The check() method is an example of a fail fast design. Programs should
detect and report error conditions as early as possible.
Another example of "fail fast" in the renderer are constructors that throw
NullPointerException if they are passed null pointers. In other words,
refuse to construct an object that is likely to cause a problem later on.
Java's IllegalArgumentException is also used by some method to "fail-fast".